
Photos help us remember the best moments of our life. It also helps to capture things that stand out of our everyday environments. Some admire art while some just wallow in the beauty of nature, others.... they just have some funny sort of attraction to point there shutters at. Having the best camera , large storage space and the likes doesn't always stand in the way. File deletion or file loss is one of the things that photo lovers try to avoid. Today, I'd be showing you how to recover deleted photos from your android phone. impossible? well, thank me later.
Okay! A little explanation to how this works. Whenever you delete a file from your storage device, the file that has been deleted leaves a footprint in that location where it was, this footprint remains active till that location is occupied by a new file. imagine walking on the beach shore. you leave footprints and the only thing that can mess up your footprint is either when the waves washes your foot prints away or another person walks and lays his or her own footprint on the existing print of yours. The wave is the phone operating system using up the old space for system files. the new foot print is some sort of file that you saved and has now replaced the older foot print. Piece of advice, as soon as you delete a file, disable data connection so your apps don't write on that sector with the print and don't do any deletion, download, moving or copying of files. stay away from application and software updates as well.
Procedure
1. Download a free program onto your computer called Dr Fone forAndroid by Wondershare (available for Mac or PC).
1. Download a free program onto your computer called Dr Fone forAndroid by Wondershare (available for Mac or PC).
2. Install the program and launch it. You'll see the screen below.
Connect your phone to your PC with a USB cable.
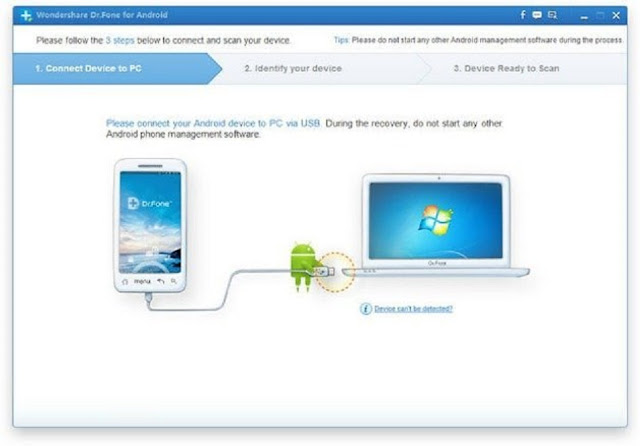
Connect your phone to your PC with a USB cable.

3. Connect your smartphone to your computer with a USB cable. You
need to have USB debugging enabled on your smartphone for this
process to work. If you do not already have this option enabled,
simply go to your Settings > About Phone and tap the Build Number
repeatedly until the notification appears to say Developer Options have
been enabled.
Back in your main Settings screen you'll see Developer Options down
near the bottom. Scroll through the settings until you see USB
Debugging and check the box beside it. You'll see a notification at the
bottom of the Dr. Fone screen saying that USB Debugging is being
opened.
USB debugging must be enabled for data recovery to work.
4. Once Dr Fone for Android has made the connection to your
smartphone you'll be able to select from the following categories of
deleted files.
smartphone you'll be able to select from the following categories of
deleted files.

We're only after photos, but of course, if you've lost
more than just photos you can tick as many as you like.
Most recovery programs can save a whole variety of important data.
more than just photos you can tick as many as you like.
Most recovery programs can save a whole variety of important data.
5. The next step asks you to scan for deleted files or all files. If you're
after a quick recovery of your lost pictures to set your mind at rest,
take the 'Deleted files' option. You'll need to accept the RSA key
prompt on your smartphone (check 'Always accept' to make it easier),
making the connection between the two devices secure and, of
course, grant Superuser permission when prompted.
6. One this is done, Dr Fone will analyze your phone. There will be
reboots and possibly some weird screen popping up on your phone.
Just let Dr Fone do its thing.
reboots and possibly some weird screen popping up on your phone.
Just let Dr Fone do its thing.

Let the program scan your device for current and deleted files.
7. Once Dr Fone has finished analyzing your phone you'll get the scan
results screen where you can check the boxes for the photos (or other
files, as you can see below, depending which file types you selected
earlier) that you want to save, then hit 'Recover' and you're golden.
Simply choose the files you want to save and hit recover.
results screen where you can check the boxes for the photos (or other
files, as you can see below, depending which file types you selected
earlier) that you want to save, then hit 'Recover' and you're golden.
Simply choose the files you want to save and hit recover.

8. If you've made it this far you've hopefully learned a valuable lesson
and will make regular copies of your smartphone data from now on.
and will make regular copies of your smartphone data from now on.
Don't worry, i have plenty of tutorials here to share. Get some good knowledge and never have to worry again.


0 comments:
Post a Comment